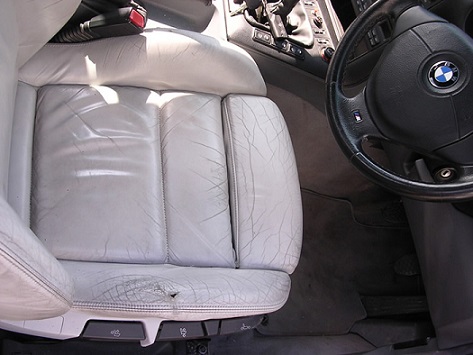
So you bought a car with leather seats. You didn't buy it because you enjoy the feeling of sitting on the excruciatingly hot leather on a sweltering summer day and screaming out in pain as the nearly melted material scorches you through your thin khaki shorts. You also didn't buy it because on a cold winter morning you enjoy trekking through two feet of snow only to get into your car and sit on what feels like a recliner made out of solid ice while desperately waiting for the heater to stop blowing cold Siberian air directly in your face. No, you bought a car with leather seats because it's a luxury feature that you can enjoy when the temperature is just right.
But leather seats can rip fairly easily, and need to be properly maintained with leather moisturizer and protection from the sun in order to ensure that they look nice when you pick someone up for that first date or try to impress the boss to get that promotion that you are competing against Kevin for. Thankfully, there's a great option for repairing your leather seats without having to replace or re-upholster them; car leather repair. Let's take a look at what car leather repair is and how well it actually works.
Here are the steps you would normally take when performing proper car leather repair using a car leather repair kit that can be found in most general automotive parts stores.
1) Clean the area where there is damage to the leather using a non-soapy cleaner.
2) If the rip in the leather is bigger than what is typically a quarter of an inch, you will want to use the piece of backing fabric which will be included in your car leather repair kit. This will provide a backdrop of support for you to apply the compound to the damaged part. You will want to apply the backing fabric around and into the tear, and use adhesive to make sure that it's properly applied.
3) Find a piece of the grain paper that most closely matches your leather upholstery. Draw the approximate shape of the tear or hole on the back of the paper, so that you can cut it closest to the damaged style.
4) If the tear or hole is deep, use some of the adhesive to cover the backing fabric and apply over the damaged area until it's level with the rest of the leather. (Note: the adhesive will take some time to dry, so make sure to follow the instructions that come along with the kit to determine how long it will take to dry)
5) Use the mixing guide in order to properly match the compound to your leather as accurately as possible. This may take a few tries to get right.
6) Apply the compound evenly and smoothly to the damaged area. Make sure to wipe up any excess compound runoff before it dries.
7) Take the grain paper from Step 3 and place it on the damaged area, and then warm up the heat transfer tool that comes with the repair kit on a hot iron. Rub the heat transfer tool onto the grain paper as it's applied to the damaged area. Do this in an even and circular motion. This will cure the compound.
8) Allow the repair to cool off and harden.
The above instructions are for a store bought personal car leather repair kit. If you have bigger tears, or multiple tears that require extensive work, you're better off using a professional car leather repair facility. Oftentimes, businesses that offer leather repair will also offer upholstery, windshield repair, vinyl repair, and a host of other cosmetic auto repair functions. But if you want your car in pristine condition, make sure that you keep the leather in tip top shape.
MechanicAdvisor.com is one of the largest online mechanic resources in the US. We are the premier website for consumers to research and connect with reputable local mechanics for routine and specialty automotive repair. Our website features instructional videos, articles about maintaining your car, and detailed profiles of over 500,000 mechanics across the country. If you're a shop owner, please claim your shop page for free here.